Scratch is an object-oriented programming interface that uses blocks as scripts. It will help you to start in the world of computer programming.
Activity 1: Learn by doing. Try and solve the 10 small challenges suggested in this page:
Take into account that the situations are getting more difficult. Take your time to solve it but the last two are really difficult. I will give you the solutions later.
Activity 2: Try to start working with scratch on line, watch the video first:
On line program: Get to 👉MIT scratch website and create an account. You can use your Google account. Learn all things about how to open, create, save,... programs there...
Desktop version (only in case the online version does not work for you) Download and install the desktop version. Learn all basics of this version too
Activity 3: Watch the video and, following its instructions, create your first scratch program.
Activity 4: Do a similar project with the following coditions:
Two sprites (characters) that move alone and interact and do something funny.
Two different scenarios
A short story
Include your name on the final credits
Download the project with option "save on my computer". 📗Upload the sb3 document in your virtual class: scratch1 👀Tip: Before sending documents, check the name it has. Never send documents with the name: project, trabajo, untitled, docum1, scratch, ... better if you name it: AGomez2Aproject1 or even JuanRP-exerc2, so that the document can be identify with you
👀Tip: Scratch File Menu: How to save, download, load, ...
What is a spectroscope? It is a device that breaks down radiation (e.g. that of the sun) and makes the result, a spectrum, visible for the observing person.
To make the spectrometer you need first to know whitch are its elements or parts:
entrance slit
grating
detector
So you would need to design a device with all these elements, by studying what is the best way to catch and view the spectrum. Instead of that you can choose one of some existing designs, to try and learn from it... Later you may give proposals about changes and improvements.
Possible designs:
Here I give to you some possible designs for your spectrometer. Revise all of them and choose, according to your criteria, the best one to be made.
How to calculate the scale when you have the dimensioned drawing.
Remember that the dimensions in the drawing are always real dimensions in mm.
Watch this video that shows an example:
Calculate the real dimensions of an object when you have the drawing and the scale.
Example for reducing scales:
Calculate the real dimensions of a microchip knowing the scale: 20:1 (enlarging scale)
Learn also how to dimension the drawing later
Learn now how to dimension a drawing.
Remember that you need to include always the real dimensions in mm.
Remember also that all dimensions that you read on a drawing are real dimensions in mm.
Watch these two videos to understand how to do it:
👉Project Sketchup 04: Draw the scaled and dimensioned views of figures 44 and 45, Include both and their correspondant 3D figure in one single document similar to the ones you did before.
Draw the views of figure 44 using the scale 1:1.
Use the 1:10 scale to draw the views of figure 45,
Add all dimensions in both 3D and views of figures 44 and 45
Do not forget the title block where you have to say the scale you are using and the unit in mm
Find here the solutions to the exercises 9, 10 and 11 of unit 2
Draw, using sketch up, four or six of the following figures: (18-4, 18-5, 18-6, 18-7 , 18-8 , 18-9, 18-10 and 18-11)
Export the four figures and paste them to a Word document using Office 365. Remember to include your name and the figure name in each of the four figures. The final result, including the tittle block, should look like this
👉Upload the final pdf document. If you have time and want to improve your mark you can do the six figures instead of four.
👉If you did not do correctly the first two activities repeat it and upload it again.👈
Another useful tool is sketchup, [https://www.sketchup.com/https://www.sketchup.com/products/sketchup-free]. You only need a google account to open and model with the program. ADVICE: Try not to use your mobile number to sign in the gmail account, use another account instead. Here you have a post to help you with it.
👀 Watch this video to know how to start with sketchup:
Do the drawings considering that each square = 10 cm = 100 mm
Export the figure as a png file and paste all of them in a DIN A4 sheet as you can see here, include a title block with name, surname, class and description of the work:
👉Do activity in pairs using the Office 365 sharing the document. Export the document later as a pdf document and upload it using the EducamosCLM platform. Be sure you meet all the conditions and date. More details in your virtual lesson in EducamosCLM.
Add the title block in the document footer with your name, surname and class and include sketchup01 as the exercise name.
Watch these videos to learn:
👀 How to create one of the figures, how to save with skech up and how to export the png drawing that ca be pasted on a word document later. The video has three parts:
1.- Open sketch up, organize the folders and working area
2.- Draw the figure, step by step
3.- Save, export, crop...
👀 How to create your title block for all your Technology projects, how to paste and adapt your figures to the document and how to save it as pdf document.
Hallo everyone, this site will be for the second year technology students.This way, you can revise the content you have learned in class and find also more detailed information about the topics you may find interesting.
We can start revising the videos you could watch in class as examples of the different types of work organization: craftsmanship, mass production and major engineering works. You can also see a fragment of a funny film to show one of those types of work organization.
👉 Exercise 1. Unit 1. Download and fill in the following exercises. One is to be done watching the videos 1,2 and 3. The exercise 2 is to classify products according to the three main ways of work organization.
The last stage of the Technological Process is the evaluation and one part of it is the public presentation of the project.
To do that you have to prepare some documents with relevant infomation about all the Technological process you have followed.
You can find all technical report documents here, but watch also this video that helps you preparing all the content needed to make the poster...
And, to support your presentation, you will have to make a poster with all the information:
Here you have another video that explains how to do it using PowerPointtemplates downloaded from this web side:
In case you do not have the PowerPoint program installed on your computer, or you prefer to do the poster using an online application, watch the next video that explains how to use these two options:
Microsoft PowerPoint 365 included on your educastillalamancha credentials
Google presentations included on your google apps (minute 9:31 of the video)
Choose two beautiful bridges and identify the structural elements and the stress they are bearing.
Represent the system, label its parts (elements and stresses) and give a brief explanation of the structural elements as the example shows.
Example of the activity:
This video can help you oing this project:
Steps to do the activity:
1. Choose the structure
2. Identify the structural elements and stress forces using the notes and all you have learnt in class
3. Prepare a document (google jamboard or any other whiteboard)
4. Point and label its parts as it is shown in the example
5. Include brief explanation about the the structural elements
6. Include the title block with your name and all information needed. Include there information about the strucrure. (where the bridge is, what type of bridge it is ...)
7. Export the document as a pdf or image format
8. Upload the two activities in your EducamosCLM site class
9. You have to do two bridges
Example with another structure (swing), but you have to do it with a bridge:
When you need to open your gmail account using different devices it is usually very annoying to have to use your mobile phone and verify that you are you...
If you use a very secure password (letters, numbers, symbols) on your gmail account you do not need the double verification that involves the use of your mobile phone.
Example of secure password: Using the first line of the song: We are the champions my friend...
Take the first two letters of every word with some capital letters: WeArThChMyFr
To make it better change some letters by numbers and symbols: W34r7h(hMyFr and it is done!!!
More information about how to create a strong and easy to remember password and remember it... here
This link leads you to an article that explains how to avoid the use of the mobile
This video explains how to open the google account wihout giving your telephone number:
This link leads you to the "Oficina de Seguridad del Internauta" OSI that depends of the Spanish Govern and explains everything in Spanish. There you can find the advantages and desadvantages of having your mobile phone linked with your gmail account 👉 here
You are about to use a dangerous tool, the hot glue gun. To avoid workshop accidents copy in your notebook and make sure you understand the safety rules you will have to follow:
Do not touch the hot nozzle or hot glue
Never point the gun in the direction of another person
Be especially careful with the cable. Never touch the cable with the gun nozzle
Do not leave your glue gun plugged in an unattended place, other people may come in contact with the hot appliance.
Only use glue sticks that are recommended for your particular glue gun and never introduce any other object (paper, plastic, tools...) in the gun tube
Don’t pull glue sticks out from the glue gun once the gun is plugged in and glue has begun to melt
Be careful also after unplugging your gun, take into account it is still very hot.
One of the most amazing structures on Earth are Bridges.
We are a species of bridge builders. Since time out of mind, humans have engineered structures to solve obstacles, such as, say, Jiaozhou Bay. There, there is now a 42.5-kilometer bridge that links the busy Chinese port city of Quingdao to the Chinese suburb of Huangdou.
In addition to this we have tamed steel or stone in an effort to reach the places, people and things we desire.
Although the concept itself is as simple as felling a tree across a creek, bridge design and construction make artists, architects and engineers to reshape the very environment in which we live.
As a result, we inhabit a planet of bridges, some as ancient as Greece's 3,000-year-old Arkadiko bridge or as unchanged as India's 500-year-old Meghalaya living bridges, which are coaxed into existence from growing tree roots.
There are many types of bridges and we are going to study and classify so that you are able to understand how they work.
The main elements that bridge designers use to make a bridge successful are beams, arches, trusses and suspenders, and they make the pure types that we can find: beam, truss, arch and suspension bridges.
The key differences between the bridge types comes down to the lengths they can cross in a single span, which is the distance between two bridge supports, the physical braces that connect the bridge to the surface below. Bridge supports may take the form of pillars, towers or piers...
Types of bridges
Beam Bridge
If you want to build a beam bridge (also known as a girder bridge), all you need is a rigid horizontal structure (a beam) and two supports, one at each end, to rest it on. These components directly support the weight of the bridge and any traffic traveling over it. They are not very interesting to study because of its simple design, but some amazing new designs have a beam bridge as a part of it. Oresund Bridge in Sweden is an example of this.
Truss Bridges
In order to help the beam to be stronger engineers have developed several types of beams, all made with triangulated shapes.
The Forth Bridge in Edinburgh is a cantilever bridge, and you can see trusses in lots of the new designs.
Arch Bridges
After more than 2,000 years of architectural use, the arch continues in bridge designs and with good reason: Its semicircular structure elegantly distributes compression through its entire form and diverts weight onto its two abutments, the components of the bridge that directly take on pressure. Modern arch bridges like Garabit Viaduct, Yajiesha Bridge (Guangzhou) or Chaotianmen Bridge, are not pure arch but truss arch bridges
Suspension Bridge
As the name implies, suspension bridges, like the Golden Gate Bridge or Brooklyn Bridge, suspend the roadway by cables, ropes or chains from two tall towers. These towers support the majority of the weight as compression pushes down on the suspension bridge's deck and then travels up the cables, ropes or chains to transfer compression to the towers. The towers then dissipate the compression directly into the earth.
Examples of suspension bridges are Bosporus Bridge, Brooklyn Bridge or Golden Gate Bridge
Cable-stayed Bridge
At first glance, the cable-stayed bridge may look like just a variant of the suspension bridge, but don't let their similar towers and hanging roadways fool you. Cable-stayed bridges differ from their suspension predecessors in that they don't require anchorages, nor do they need two towers. Instead, the cables run from the roadway up to a single tower that alone bears the weight.
The tower of a cable-stayed bridge is responsible for absorbing and dealing with compression forces. The cables attach to the roadway in various ways. For example, in a radial pattern, cables extend from several points on the road to a single point at the tower, like numerous fishing lines attached to a single pole. In a parallel pattern, the cables attach to both the roadway and the tower at several separate points.
Millau Viaduct in France and Octavio Frias de Oliveira Bridge in Brazil are good examples
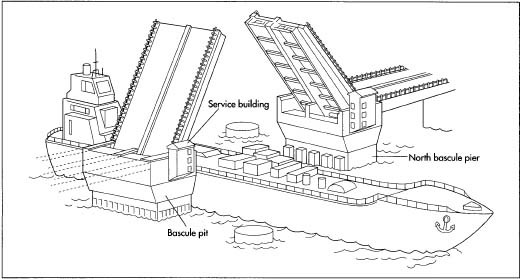
Draw-Bridge
Type of bridge that can be open to let boats or ships sail under their decks.
The Tower Bridge in London is a very famous example of this type and Gateshead Millenium Bridge is an incredible and original design.
Here you have some exercises to check how good you are using MS Paint appication or other graphic editing software.
Getting started with Paint:
1) Get familiar with the MS paint and draw a Grid following this link:
2) Using the grid you have done, draw an hexagon
3) Draw finally a Stop sign like the one beside and save it